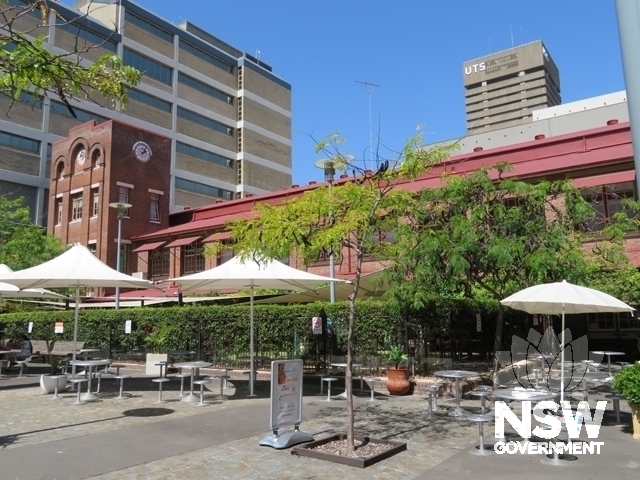
Subject: TAFE NSW Ultimo Campus: Main Campus Site Plan
Photographer: Google Earth with Robertson & Hindmarsh Pty Ltd overlay, 2018
Copyright owner: No Credit
Date: No Date
Subject: [Site Plan of] Technical College Ultimo Sydney by W.E. Kemp, 1891
Photographer: Scan of original artwork supplied by TAFE NSW
Copyright owner: No Credit
Date: No Date
Subject: [Site Plan of] Technical College Ultimo Sydney by W.E. Kemp, 1899
Photographer: Technically & Further, 1991, p.103
Copyright owner: No Credit
Date: No Date
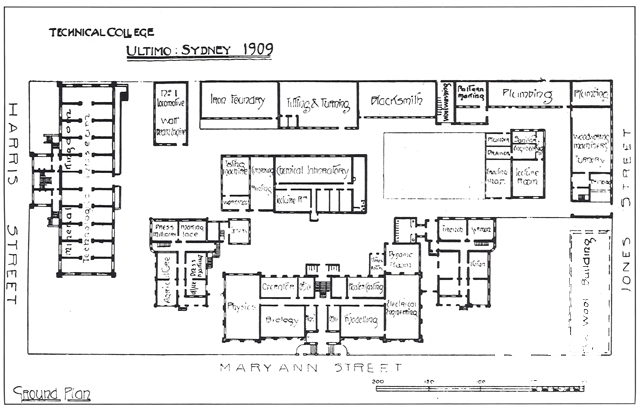
Subject: Technical College Ultimo Sydney, Ground Plan, 1909
Photographer: Technically & Further, 1991, p.104
Copyright owner: No Credit
Date: No Date
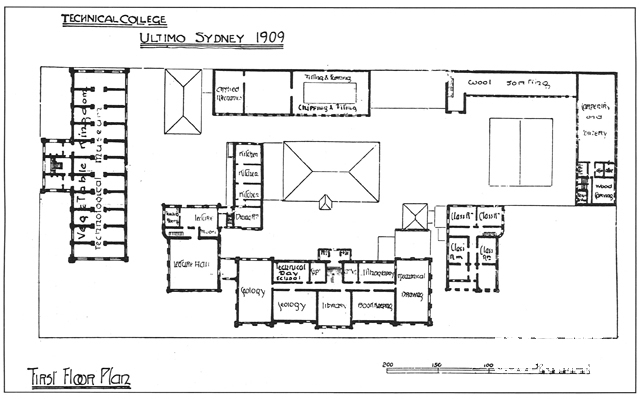
Subject: Technical College Ultimo Sydney, First Floor Plan, 1909
Photographer: Technically & Further, 1991, p.105
Copyright owner: No Credit
Date: No Date
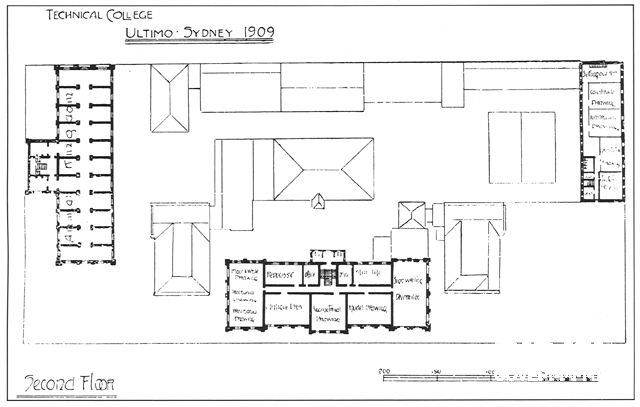
Subject: Technical College Ultimo Sydney, Second Floor Plan, 1909
Photographer: Technically & Further, 1991, p.106
Copyright owner: No Credit
Date: No Date
Subject: [Perspective of] New Technical College, Pyrmont, 1891
Photographer: The Sydney Mail, August 15, 1891
Copyright owner: No Credit
Date: No Date
Subject: [Perspective by Fulwood of] Sydney Technical College, 1891
Photographer: Scan of original artwork supplied by TAFE NSW
Copyright owner: No Credit
Date: No Date
Subject: [Perspective of] Technological Museum, nd
Photographer: Sydney Mail, 12 August 1893
Copyright owner: No Credit
Date: No Date
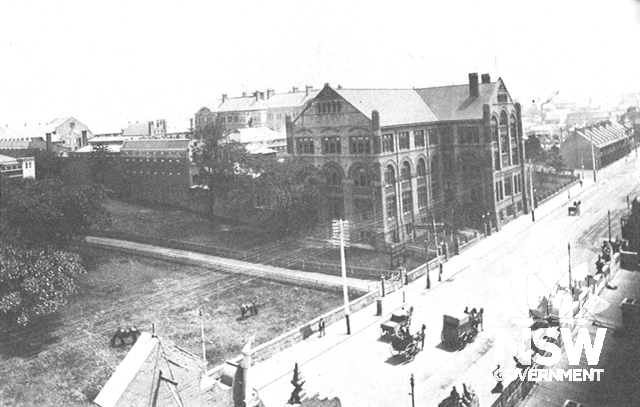
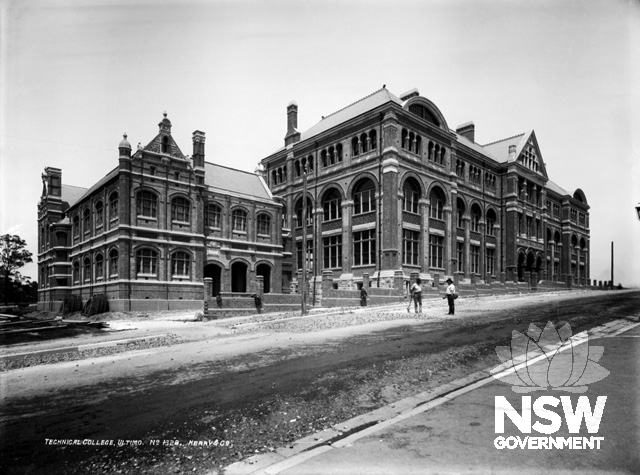
Subject: Technical College, Ultimo photo no. 1328 by Kerry & Co, nd
Photographer: SLNSW, [Views of Sydney] Kerry & Co: 1880-1899, DL PX 138
Copyright owner: No Credit
Date: No Date
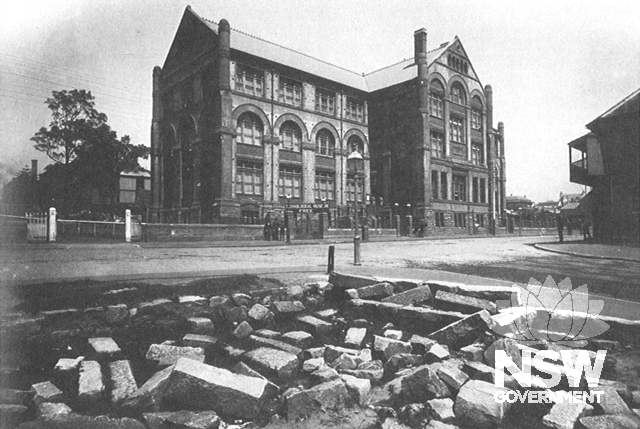
Subject: Sydney Technical College [Buildings C, B & A], nd
Photographer: SCC Dictionary of Sydney
Copyright owner: No Credit
Date: No Date
Subject: Sydney Technical College [Buildings C, B & A], 1904
Photographer: No Author
Copyright owner: No Credit
Date: No Date
Subject: Sydney Technical College [Building A], nd
Photographer: Spanners, Easels & Microchips, 1983, p43
Copyright owner: No Credit
Date: No Date
Subject: Sydney Technical College [Building A entry stonework], c.1915
Photographer: R.T. Baker, Curator, Technological Museum, Building and Ornamental Stones of Aus
Copyright owner: No Credit
Date: No Date
Subject: Sydney Technical College [Building A entry Lyon & Cottier stained glass], c.1876-1915
Photographer: SLNSW Image c12753_0009c, ML DGD 30 folio 9 Lyon & Cottier & Co drawings
Copyright owner: No Credit
Date: No Date
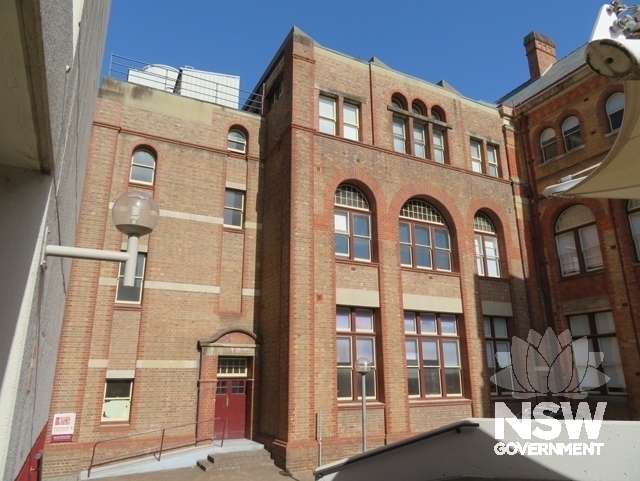
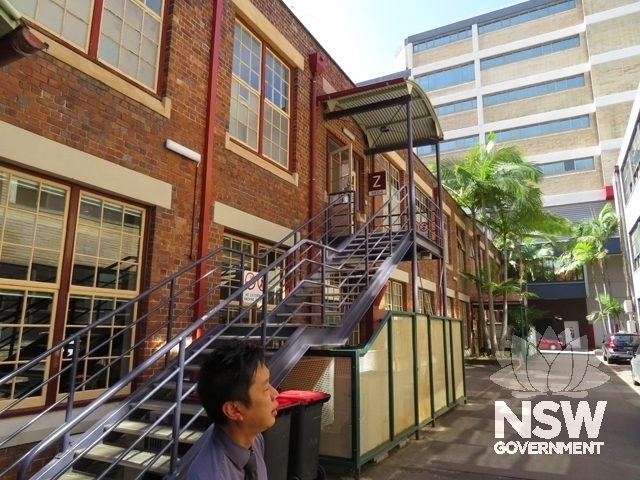
Subject: Sydney Technical College [Buildings to the rear of Building A]
Photographer: Spanners, Easels & Microchips, 1983, p59
Copyright owner: No Credit
Date: No Date
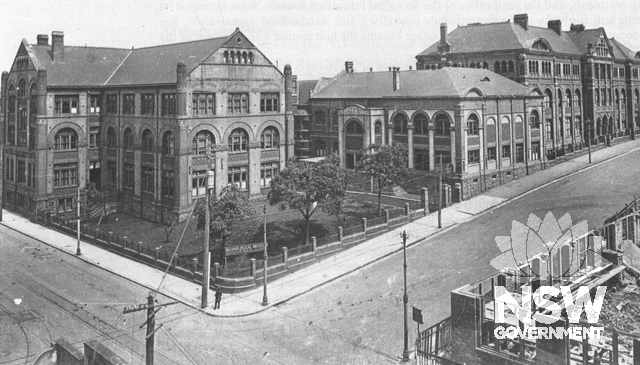
Subject: Sydney Technical College with the Harris St garden of Ultimo House on the left
Photographer: Spanners, Easels & Microchips, 1983, p58
Copyright owner: No Credit
Date: No Date
Subject: Sydney Technological Museum with the Harris St gates of Ultimo House on the left
Photographer: Spanners, Easels & Microchips, 1983, p43
Copyright owner: No Credit
Date: No Date
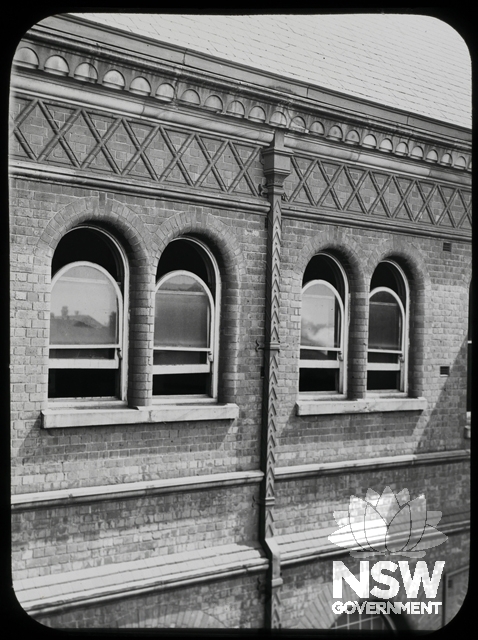
Subject: Detail of the brickwork & downpipe on Building B
Photographer: SLNSW Image c013240006h
Copyright owner: No Credit
Date: No Date
Subject: Sydney Technical College, c1915 showing extension of Building B to form Turner Hall
Photographer: Technically & Further, 1991, p28
Copyright owner: No Credit
Date: No Date
Subject: Turner Hall heritage colour scheme restoration by NSW Dept of Public Works & Services Heritage Group
Photographer: No Author
Copyright owner: No Credit
Date: No Date
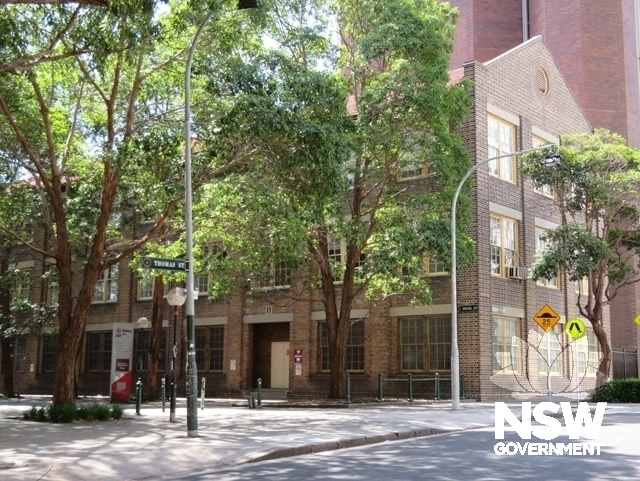
Subject: Building I (original Fort Street Boys High School), nd
Photographer: SLNSW, Government Printer’s Office collection, image d2_01262h
Copyright owner: No Credit
Date: No Date
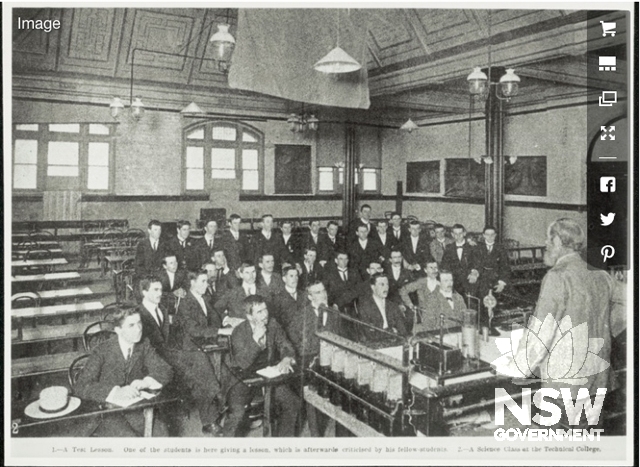
Subject: A Science Class at the Technical College, from the Town & Country Journal, 29 April 1903
Photographer: SRNSW – Series 15051 Photographs compiled by the Dept of School Education
Copyright owner: No Credit
Date: No Date
Subject: Building H (Sheep & Wool on the corner with Architecture to the south along Jones Street), 1910
Photographer: TAFE NSW website & also Technically & Further, 1991, p21
Copyright owner: No Credit
Date: No Date
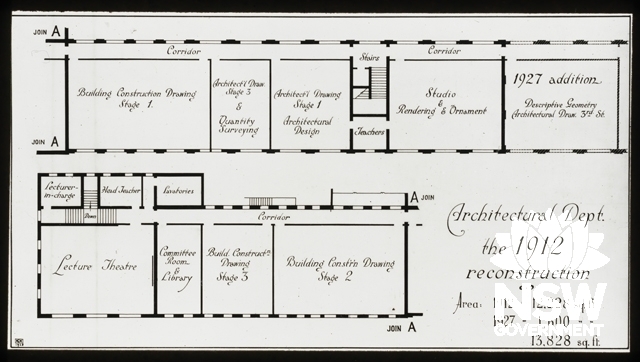
Subject: Building H plan (Architecture Dept) in 1912 with 1927 addition
Photographer: SLNSW Image c013270006h (Miles Dunphy lantern slide)
Copyright owner: No Credit
Date: No Date
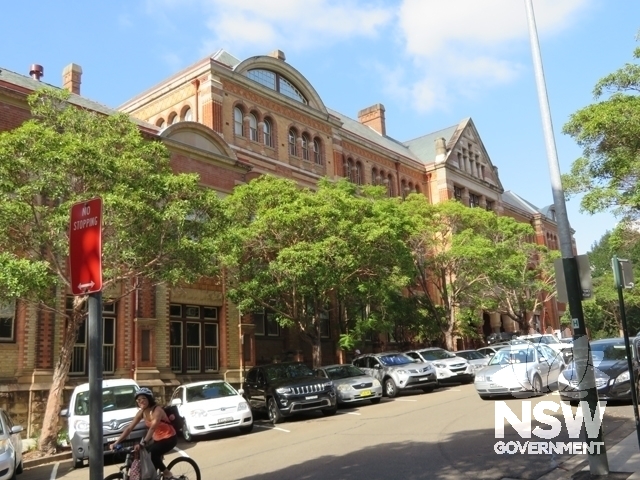
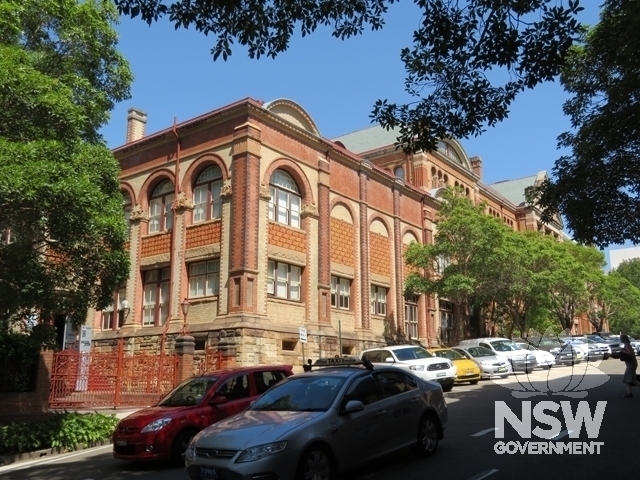
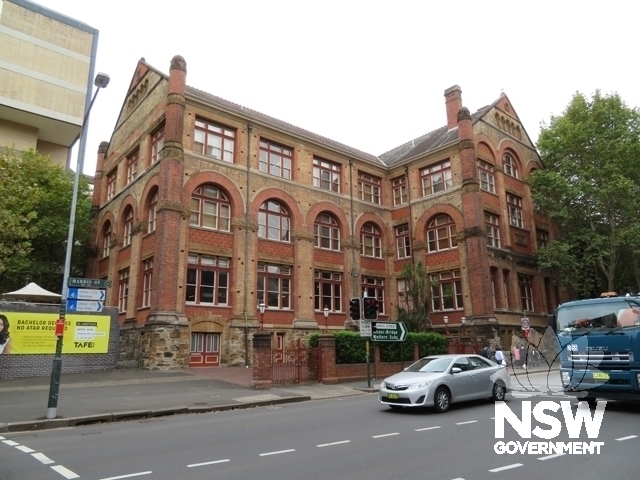
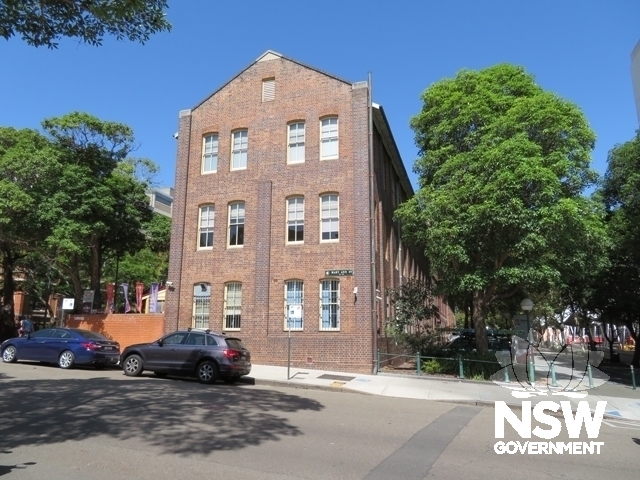
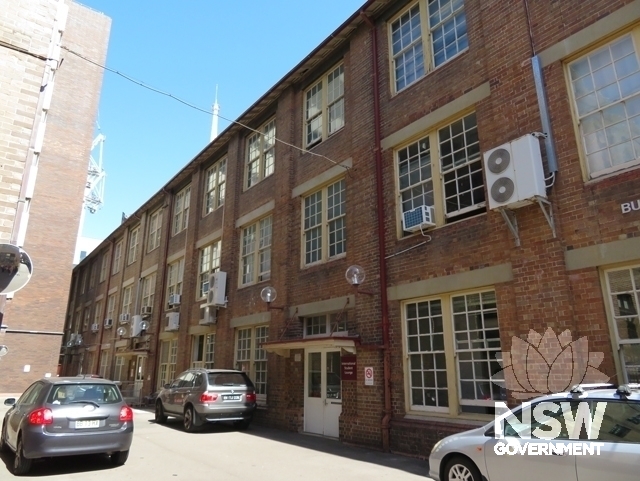
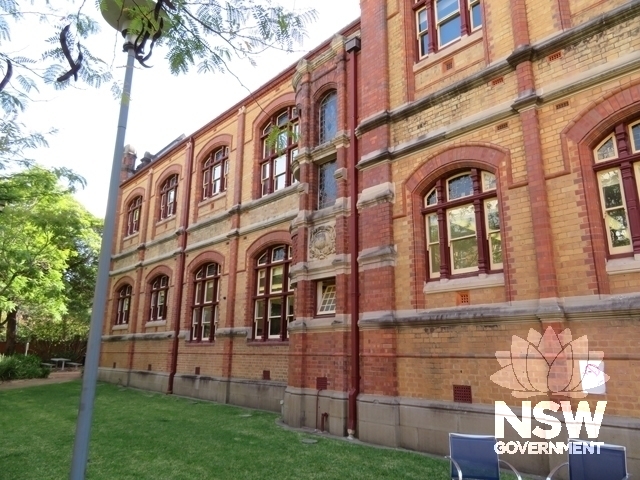
Subject: Building A: Viewed from the north-east
Photographer: Robertson & Hindmarsh Pty Ltd, 2018
Copyright owner: No Credit
Date: No Date
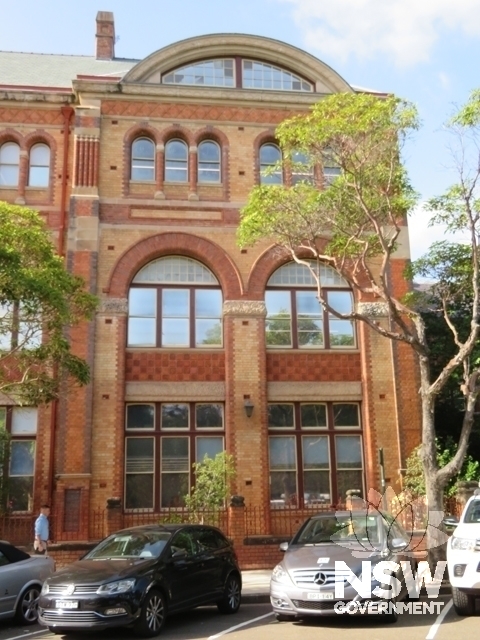
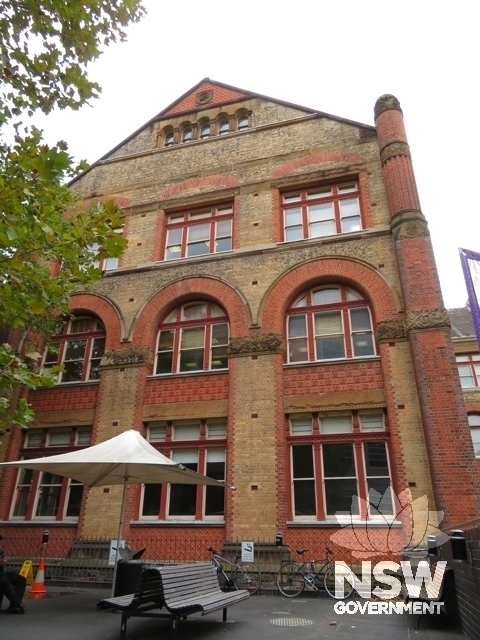
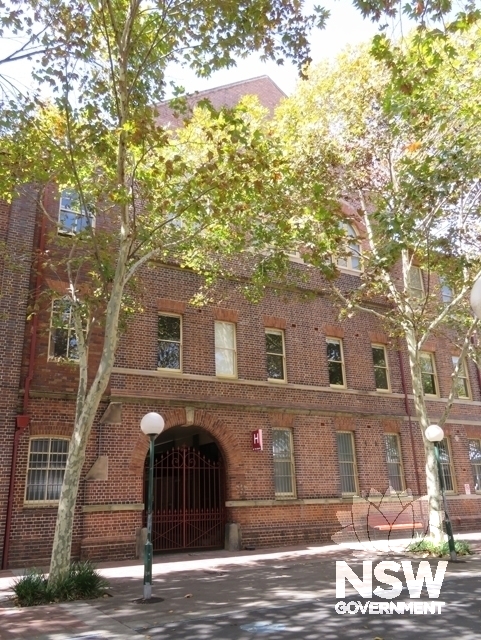
Subject: Building A: Viewed from the north in Mary Ann Street
Photographer: Robertson & Hindmarsh Pty Ltd, 2018
Copyright owner: No Credit
Date: No Date
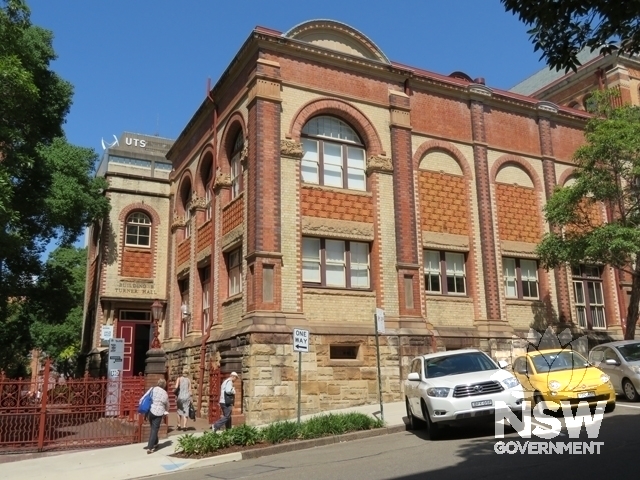
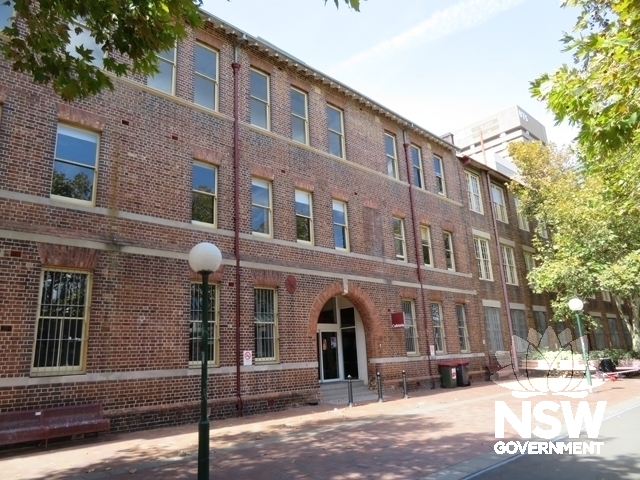
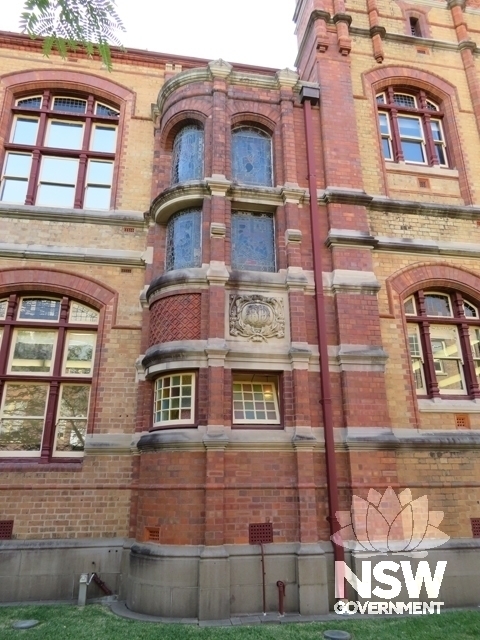
Subject: Building A: West bay viewed from the north in Mary Ann Street
Photographer: Robertson & Hindmarsh Pty Ltd, 2018
Copyright owner: No Credit
Date: No Date
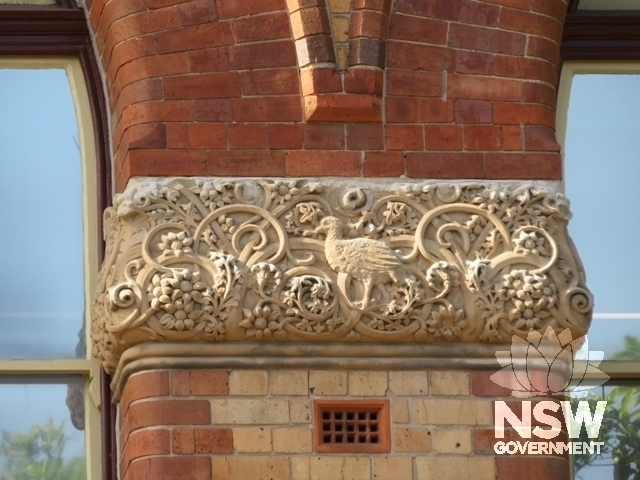
Subject: Building A: Carved sandstone pilaster capital with Australian flora & fauna
Photographer: Robertson & Hindmarsh Pty Ltd, 2018
Copyright owner: No Credit
Date: No Date
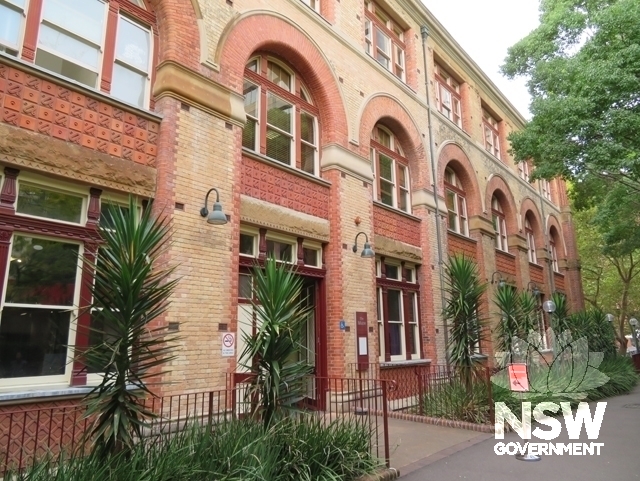
Subject: Building A: South façade viewed from the south-west near Building D
Photographer: Robertson & Hindmarsh Pty Ltd, 2018
Copyright owner: No Credit
Date: No Date
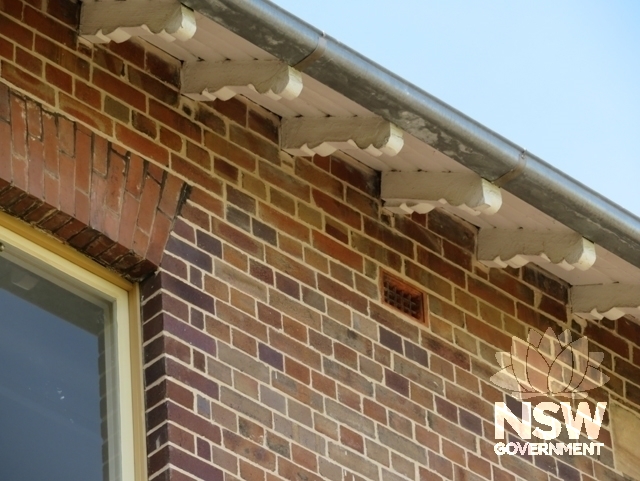
Subject: Building A: Brickwork detail on south façade
Photographer: Robertson & Hindmarsh Pty Ltd, 2018
Copyright owner: No Credit
Date: No Date
Subject: Building A: Addition at west end of south façade viewed form the east
Photographer: Robertson & Hindmarsh Pty Ltd, 2018
Copyright owner: No Credit
Date: No Date
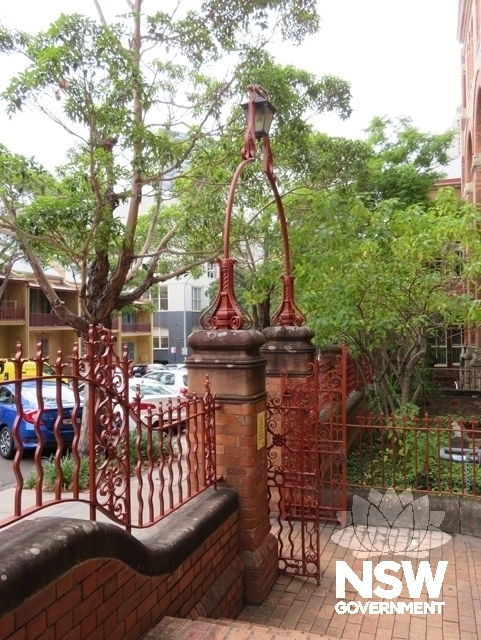
Subject: Building A: One of the entry gates from Mary Ann Street
Photographer: Robertson & Hindmarsh Pty Ltd, 2018
Copyright owner: No Credit
Date: No Date
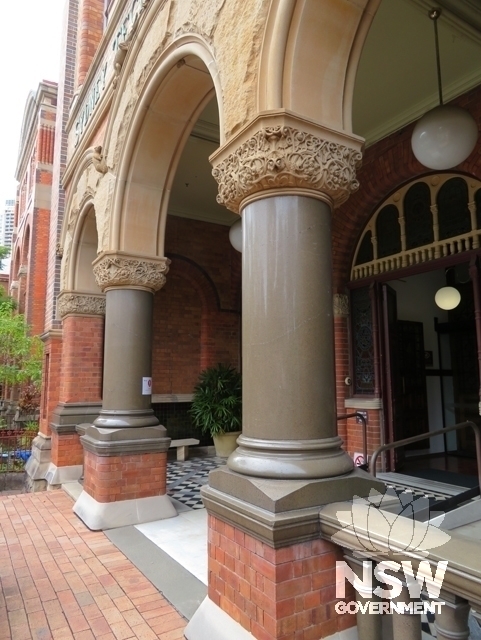
Subject: Building A: Trachyte and sandstone entrance porch arches to the main entry from Mary Ann Street
Photographer: Robertson & Hindmarsh Pty Ltd, 2018
Copyright owner: No Credit
Date: No Date
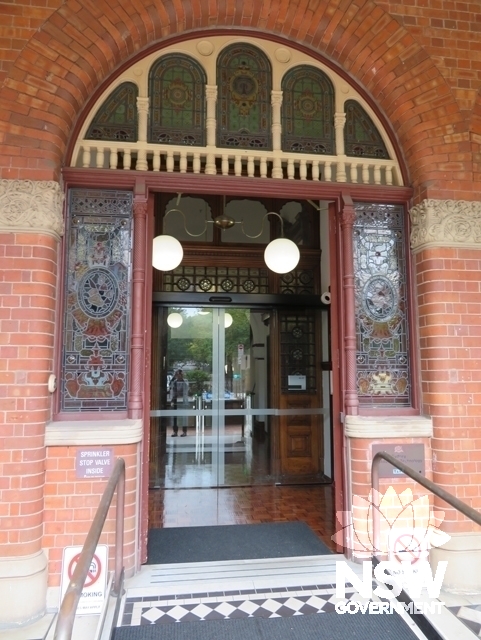
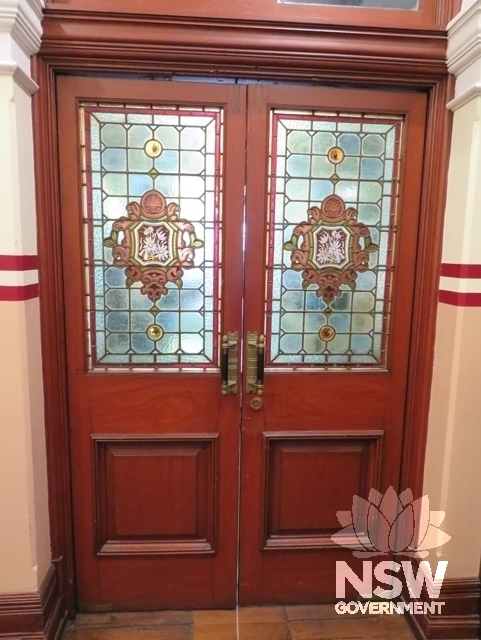
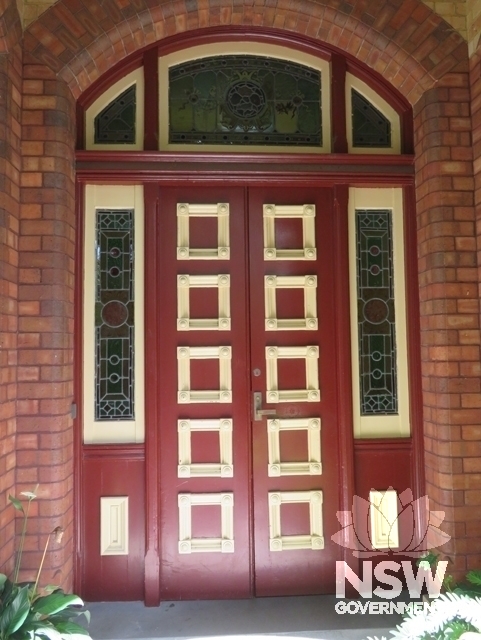
Subject: Building A: Main entry door from Mary Ann Street
Photographer: Robertson & Hindmarsh Pty Ltd, 2018
Copyright owner: No Credit
Date: No Date
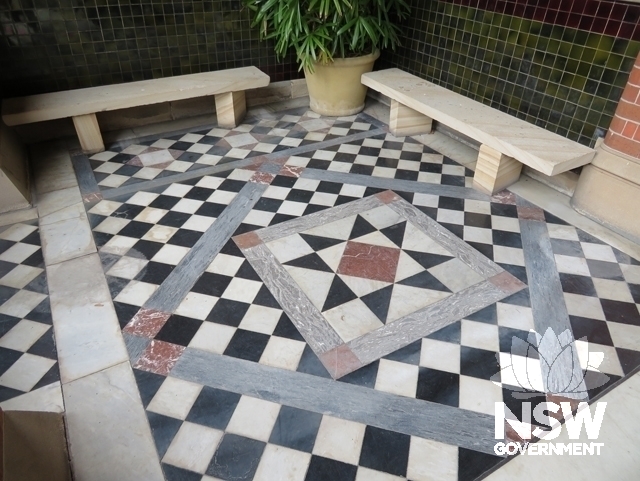
Subject: Building A: Entrance porch tile and marble paving pattern
Photographer: Robertson & Hindmarsh Pty Ltd, 2018
Copyright owner: No Credit
Date: No Date
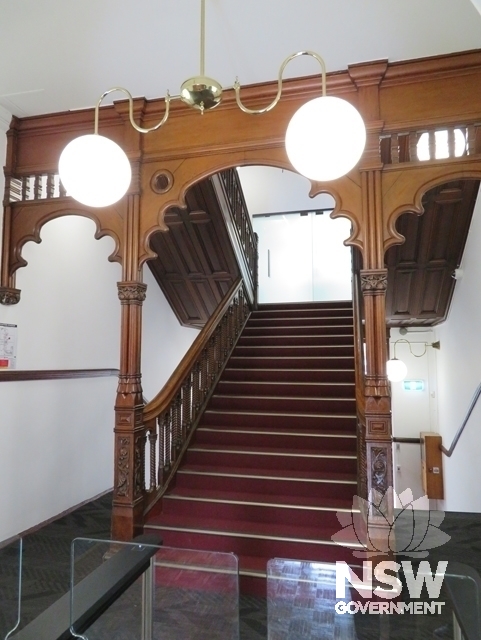
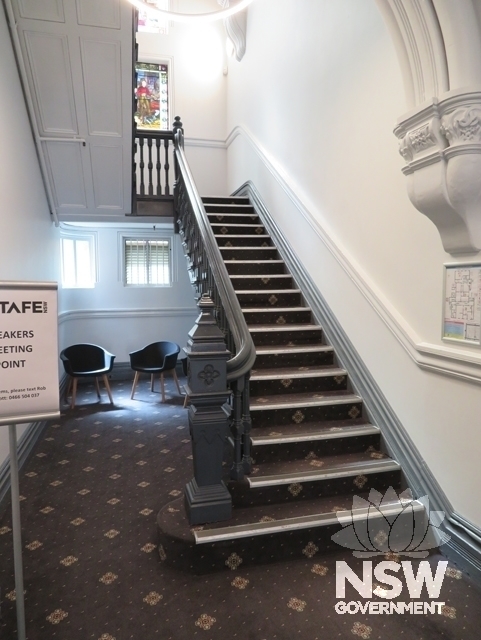
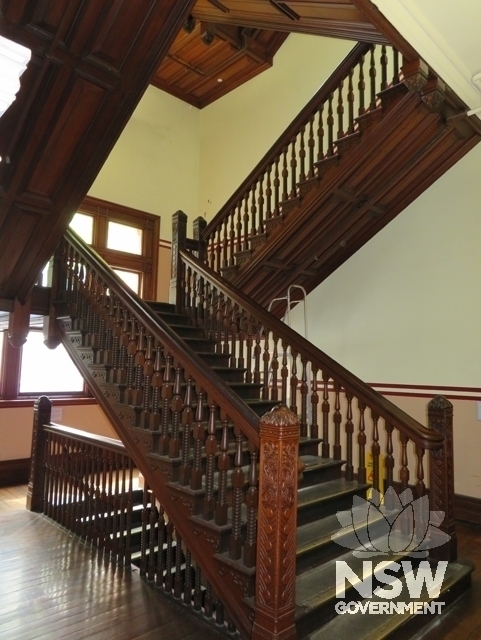
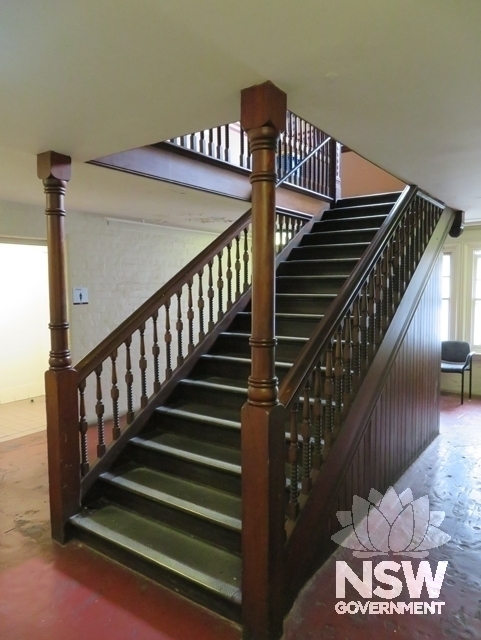
Subject: Building A: Ground Floor level of the main staircase
Photographer: Robertson & Hindmarsh Pty Ltd, 2018
Copyright owner: No Credit
Date: No Date
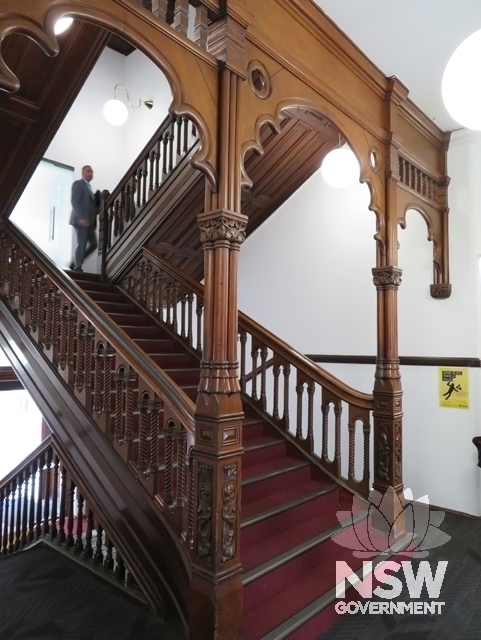
Subject: Building A: Ground Floor level of the main staircase
Photographer: Robertson & Hindmarsh Pty Ltd, 2018
Copyright owner: No Credit
Date: No Date
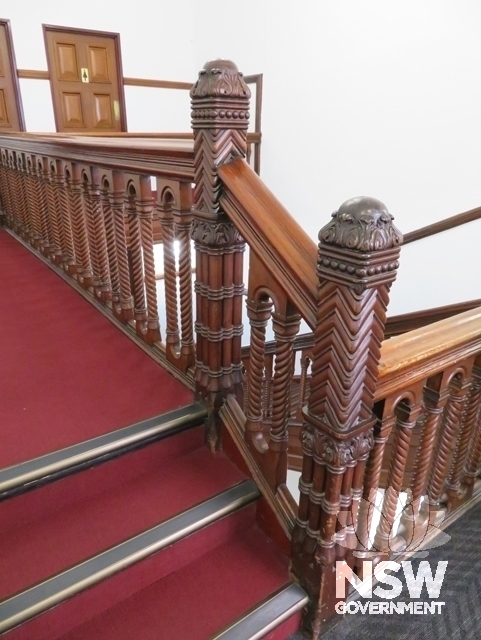
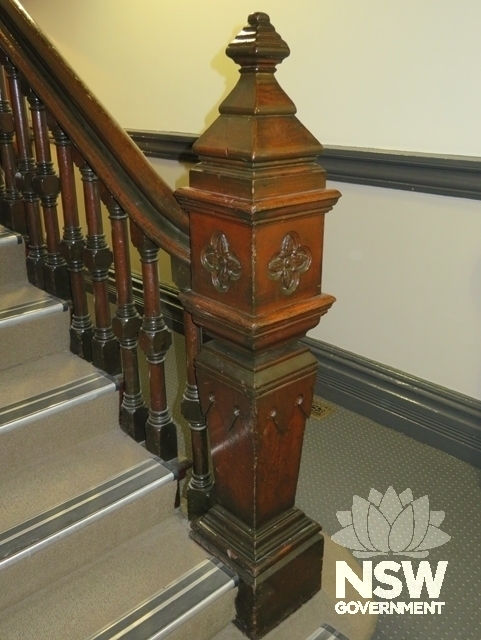
Subject: Building A: Newel posts and handrail at top level of the main staircase
Photographer: Robertson & Hindmarsh Pty Ltd, 2018
Copyright owner: No Credit
Date: No Date
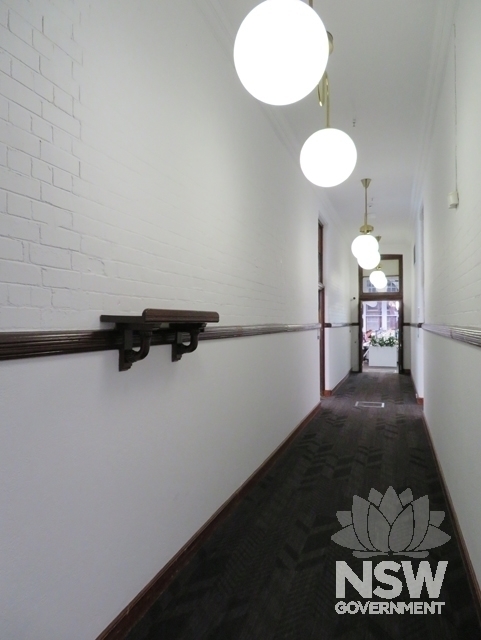
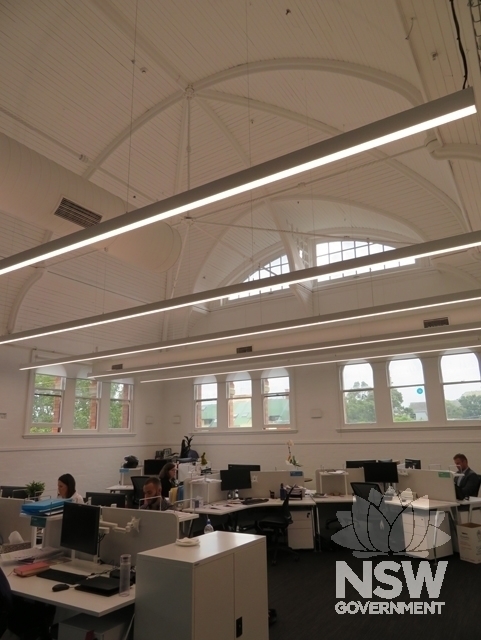
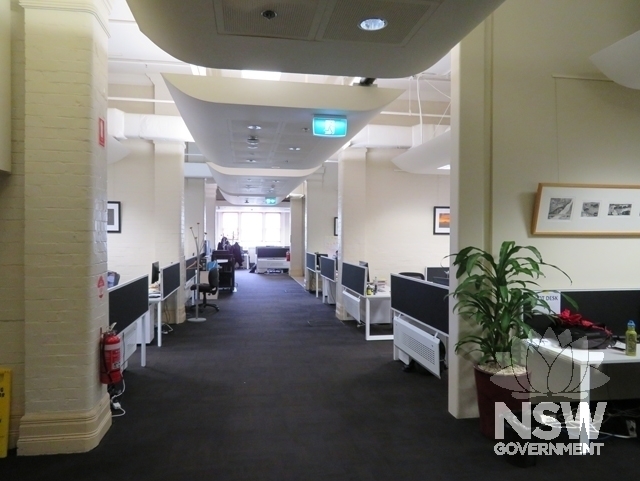
Subject: Building A: Main east-west corridor on the 1st Floor with painted brick walls (non-original colours)
Photographer: Robertson & Hindmarsh Pty Ltd, 2018
Copyright owner: No Credit
Date: No Date
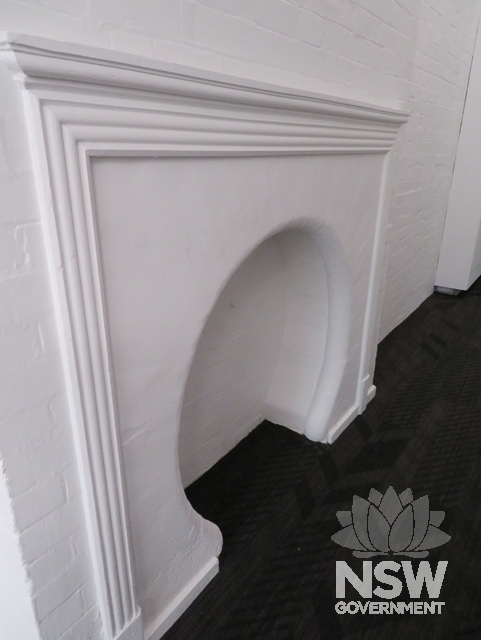
Subject: Building A: Original classroom fireplace
Photographer: Robertson & Hindmarsh Pty Ltd, 2018
Copyright owner: No Credit
Date: No Date
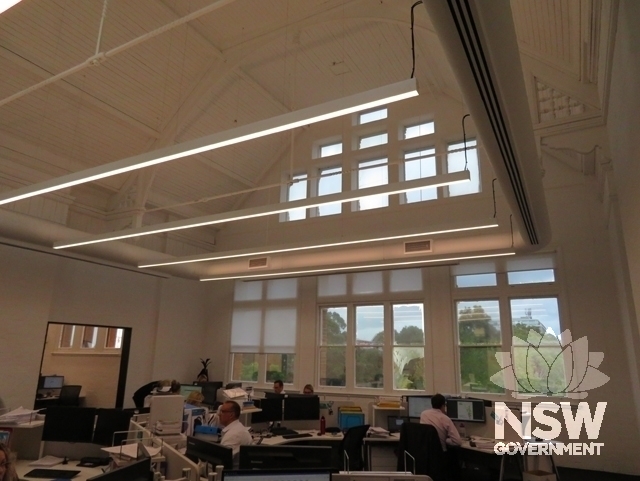
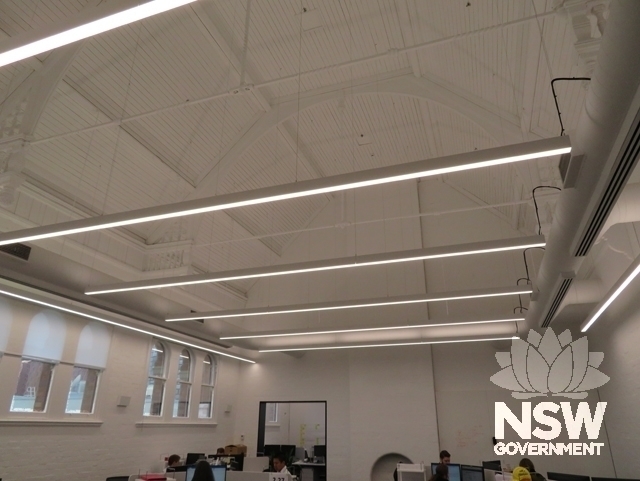
Subject: Building A: Original college library in the central bay of the Second Floor (non-original colours)
Photographer: Robertson & Hindmarsh Pty Ltd, 2018
Copyright owner: No Credit
Date: No Date
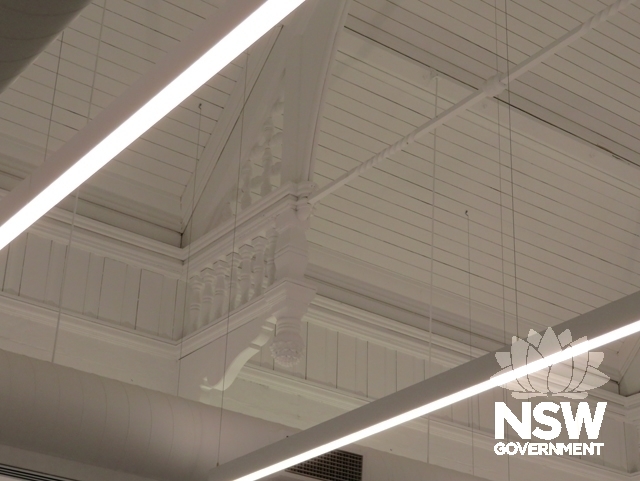
Subject: Building A: Detail of the ceiling of the original college library in the central bay of the Second F
Photographer: Robertson & Hindmarsh Pty Ltd, 2018
Copyright owner: No Credit
Date: No Date
Subject: Building A: Office area (former classroom) to the immediate west of the central bay on the Second Fl
Photographer: Robertson & Hindmarsh Pty Ltd, 2018
Copyright owner: No Credit
Date: No Date
Subject: Building A: Office area (former classroom) at the east end of the Second Floor
Photographer: Robertson & Hindmarsh Pty Ltd, 2018
Copyright owner: No Credit
Date: No Date
Subject: Building A: Office area (former classroom) at the west end of the Second Floor
Photographer: Robertson & Hindmarsh Pty Ltd, 2018
Copyright owner: No Credit
Date: No Date
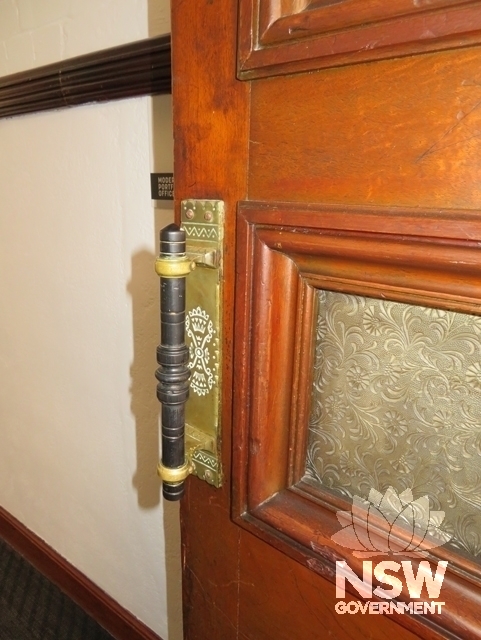
Subject: Building A: Original door furniture
Photographer: Robertson & Hindmarsh Pty Ltd, 2018
Copyright owner: No Credit
Date: No Date
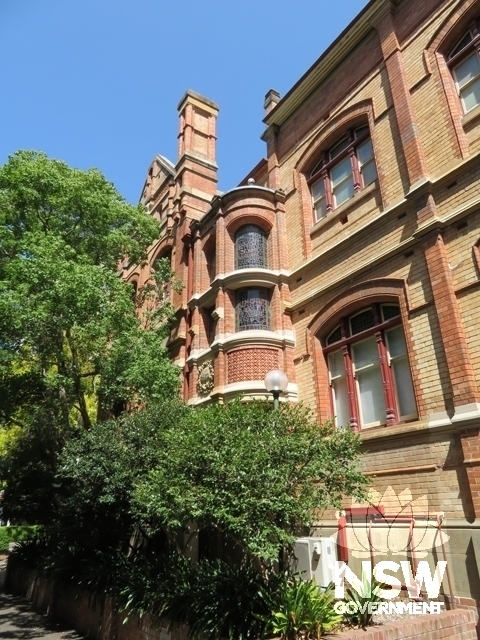
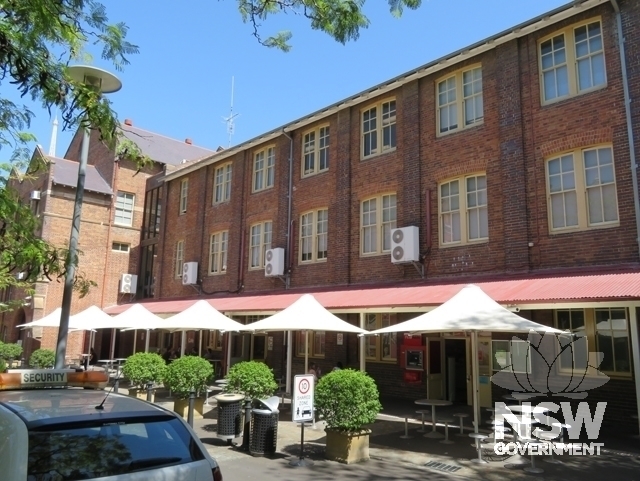
Subject: Building B (Turner Hall): Viewed from the north-east
Photographer: Robertson & Hindmarsh Pty Ltd, 2018
Copyright owner: No Credit
Date: No Date
Subject: Building B (Turner Hall): Viewed from the north in Mary Ann Street
Photographer: Robertson & Hindmarsh Pty Ltd, 2018
Copyright owner: No Credit
Date: No Date
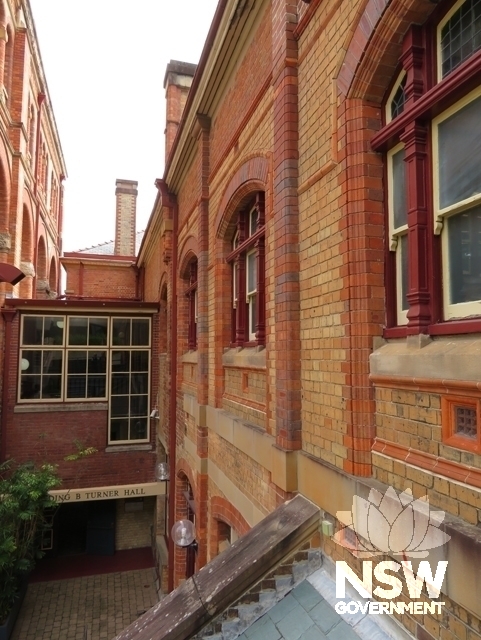
Subject: Building B: Part of east façade showing junction between Turner Hall and the former high school
Photographer: Robertson & Hindmarsh Pty Ltd, 2018
Copyright owner: No Credit
Date: No Date
Subject: Building B: Looking north along the west façade
Photographer: Robertson & Hindmarsh Pty Ltd, 2018
Copyright owner: No Credit
Date: No Date
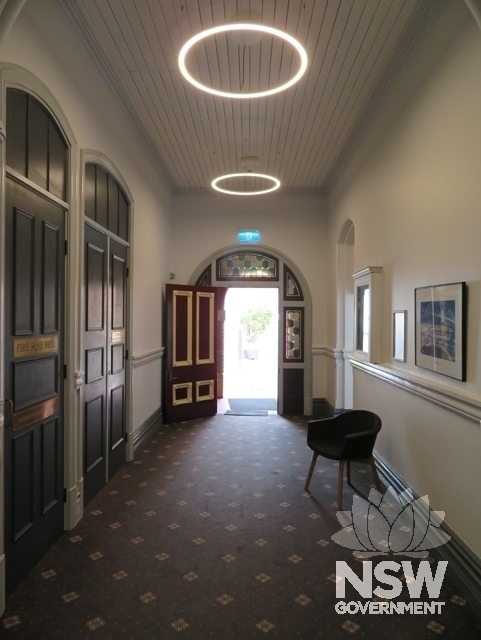
Subject: Building B: Entry door & hall looking south-west
Photographer: Robertson & Hindmarsh Pty Ltd, 2018
Copyright owner: No Credit
Date: No Date
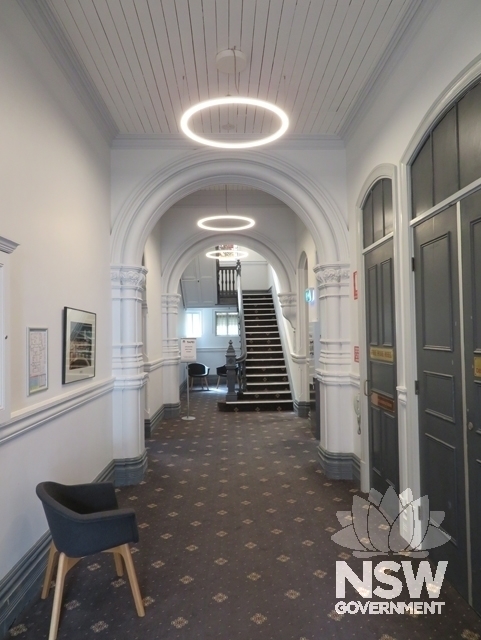
Subject: Building B: Entry hall looking north-east to the south staircase giving access to Turner Hall above
Photographer: Robertson & Hindmarsh Pty Ltd, 2018
Copyright owner: No Credit
Date: No Date
Subject: Building B: South staircase giving access to Turner Hall above
Photographer: Robertson & Hindmarsh Pty Ltd, 2018
Copyright owner: No Credit
Date: No Date
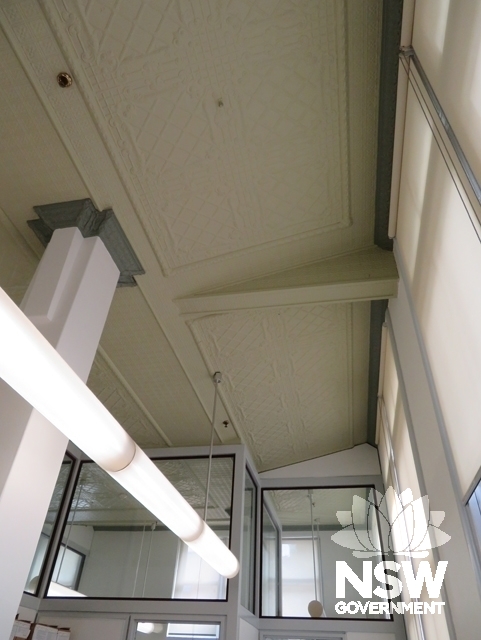
Subject: Building B: Ground Floor office with original timber ceiling & ventilator
Photographer: Robertson & Hindmarsh Pty Ltd, 2018
Copyright owner: No Credit
Date: No Date
Subject: Building B: Looking west in Building A. Stair on left is north stair giving access to Turner Hall ab
Photographer: Robertson & Hindmarsh Pty Ltd, 2018
Copyright owner: No Credit
Date: No Date
Subject: Blg B: Ground Floor office at north end with metal “fire resistant” ceiling under Turner Hall
Photographer: Robertson & Hindmarsh Pty Ltd, 2018
Copyright owner: No Credit
Date: No Date
Subject: Building B: Looking north in Turner Hall (non-original colours)
Photographer: Robertson & Hindmarsh Pty Ltd, 2018
Copyright owner: No Credit
Date: No Date
Subject: Building B: Looking south in Turner Hall (non-original colours)
Photographer: Robertson & Hindmarsh Pty Ltd, 2018
Copyright owner: No Credit
Date: No Date
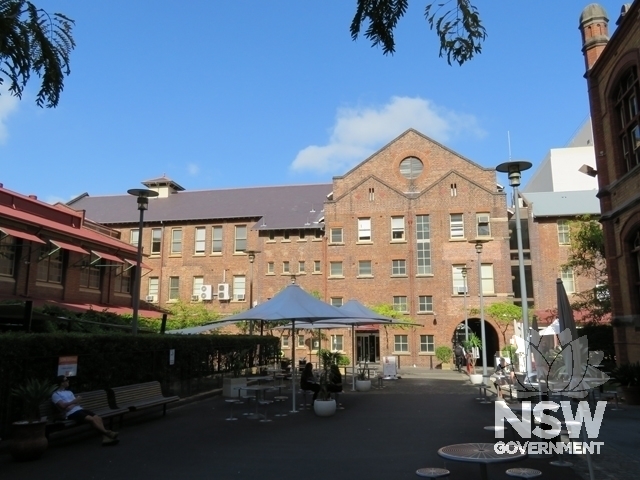
Subject: Building C: Former Technological Museum viewed from the south-east in Harris Street
Photographer: Robertson & Hindmarsh Pty Ltd, 2018
Copyright owner: No Credit
Date: No Date
Subject: Building C: West façade of the south bay of the former Technological Museum
Photographer: Robertson & Hindmarsh Pty Ltd, 2018
Copyright owner: No Credit
Date: No Date
Subject: Building C: Looking south along the west façade of the former Technological Museum
Photographer: Robertson & Hindmarsh Pty Ltd, 2018
Copyright owner: No Credit
Date: No Date
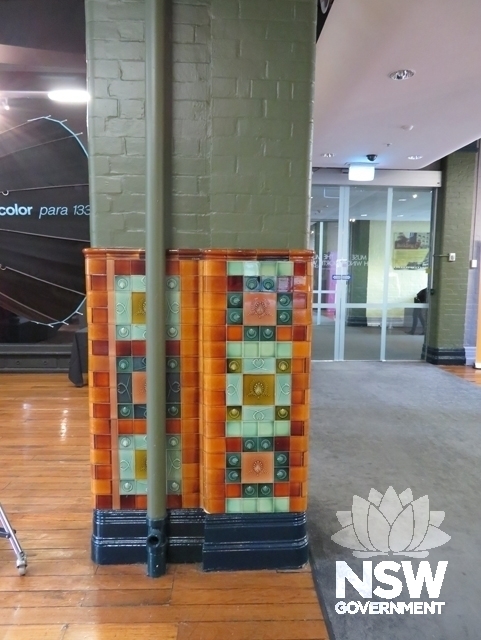
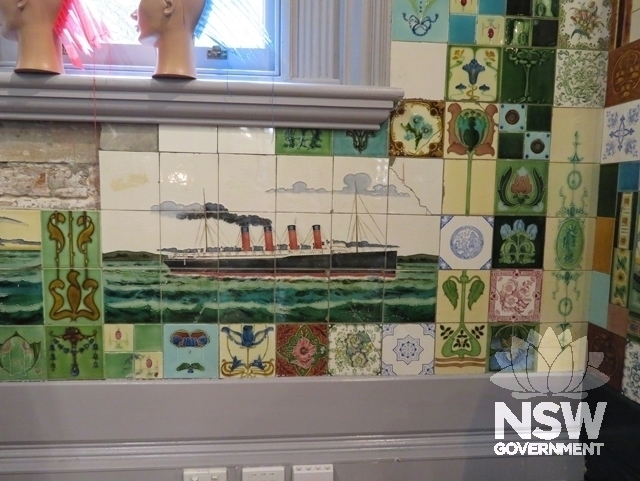
Subject: Building C: Remnant tiles from original Technological Museum display on Ground Floor
Photographer: Robertson & Hindmarsh Pty Ltd, 2018
Copyright owner: No Credit
Date: No Date
Subject: Building C: Remnant tiles from original Technological Museum display on Ground Floor
Photographer: Robertson & Hindmarsh Pty Ltd, 2018
Copyright owner: No Credit
Date: No Date
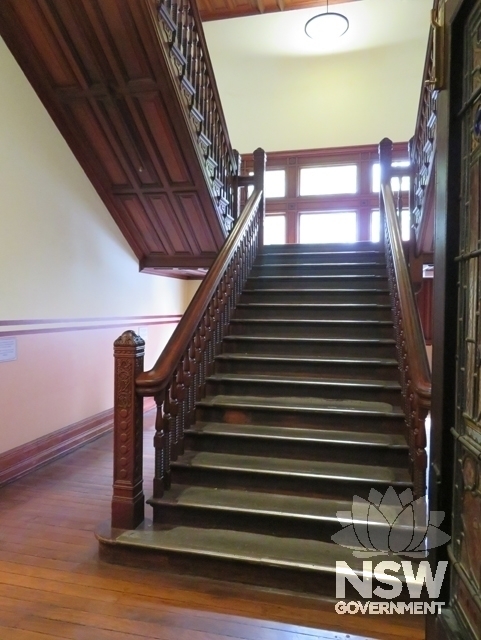
Subject: Building C: Ground Floor level of the main staircase
Photographer: Robertson & Hindmarsh Pty Ltd, 2018
Copyright owner: No Credit
Date: No Date
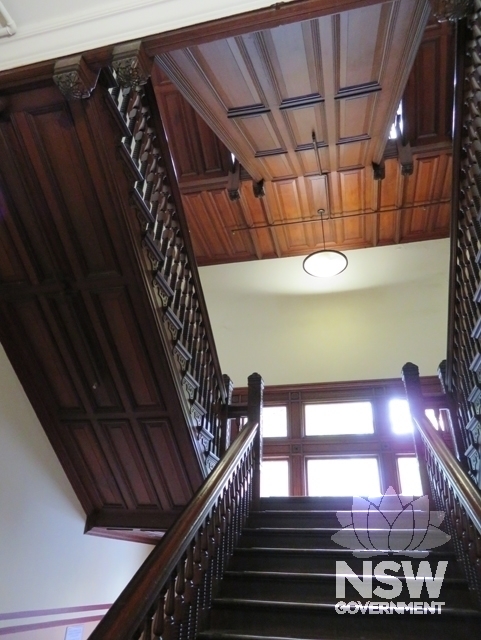
Subject: Building C: Looking up from the Ground Floor level of the main staircase
Photographer: Robertson & Hindmarsh Pty Ltd, 2018
Copyright owner: No Credit
Date: No Date
Subject: Building C: Ground Floor level of the main staircase
Photographer: Robertson & Hindmarsh Pty Ltd, 2018
Copyright owner: No Credit
Date: No Date
Subject: Building C: Looking up to the top (attic) level of the main staircase
Photographer: Robertson & Hindmarsh Pty Ltd, 2018
Copyright owner: No Credit
Date: No Date
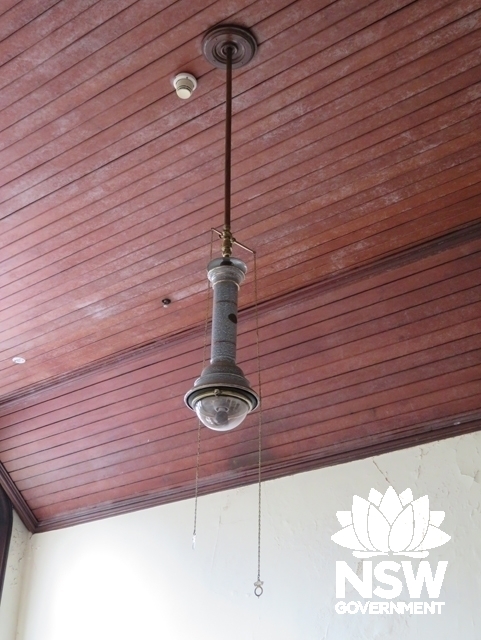
Subject: Building C: Original Multiple Mantle Gas Fitting light at the top of the main staircase
Photographer: Robertson & Hindmarsh Pty Ltd, 2018
Copyright owner: No Credit
Date: No Date
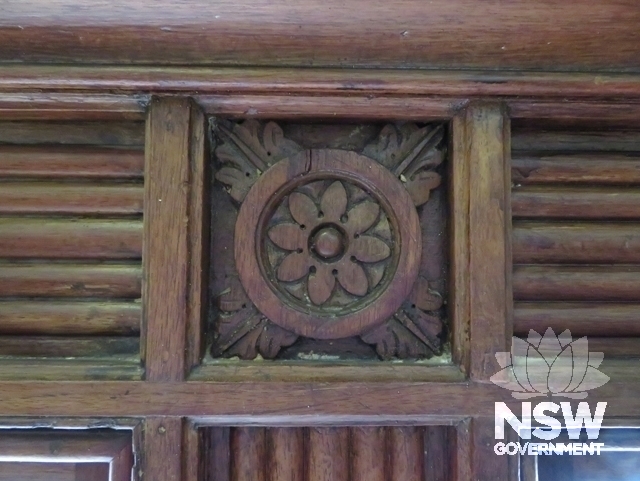
Subject: Building C: Original reeded window architrave and florette at the junctions
Photographer: Robertson & Hindmarsh Pty Ltd, 2018
Copyright owner: No Credit
Date: No Date
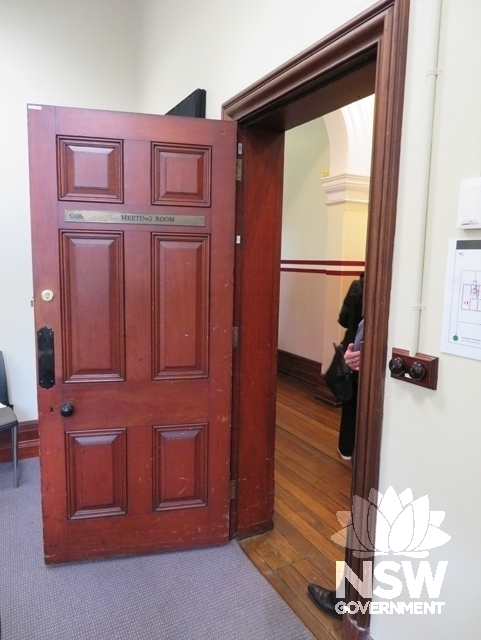
Subject: Building C: An original internal door & door furniture
Photographer: Robertson & Hindmarsh Pty Ltd, 2018
Copyright owner: No Credit
Date: No Date
Subject: Building C: A pair of original internal doors & door furniture
Photographer: Robertson & Hindmarsh Pty Ltd, 2018
Copyright owner: No Credit
Date: No Date
Subject: Building C: Looking south along the south wing of office space converted from original museum
Photographer: Robertson & Hindmarsh Pty Ltd, 2018
Copyright owner: No Credit
Date: No Date
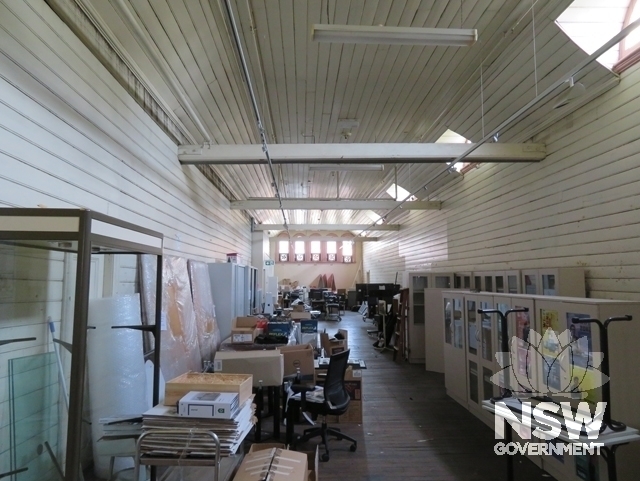
Subject: Building C: Looking south along the south half of the attic storage space
Photographer: Robertson & Hindmarsh Pty Ltd, 2018
Copyright owner: No Credit
Date: No Date
Subject: Building C: Basement level of the main staircase
Photographer: Robertson & Hindmarsh Pty Ltd, 2018
Copyright owner: No Credit
Date: No Date
Subject: uilding C: Looking north along part of the Basement level storage space
Photographer: Robertson & Hindmarsh Pty Ltd, 2018
Copyright owner: No Credit
Date: No Date
Subject: Building H north section: Viewed from the north in Mary Ann Street
Photographer: Robertson & Hindmarsh Pty Ltd, 2018
Copyright owner: No Credit
Date: No Date
Subject: Building H north section: Looking south along the east façade
Photographer: Robertson & Hindmarsh Pty Ltd, 2018
Copyright owner: No Credit
Date: No Date
Subject: Building H central section: Viewed from the east with Building Z on the left
Photographer: Robertson & Hindmarsh Pty Ltd, 2018
Copyright owner: No Credit
Date: No Date
Subject: Building H south section: Looking south along the east façade
Photographer: Robertson & Hindmarsh Pty Ltd, 2018
Copyright owner: No Credit
Date: No Date
Subject: Building H central section: Viewed from the west in Jones Street
Photographer: Robertson & Hindmarsh Pty Ltd, 2018
Copyright owner: No Credit
Date: No Date
Subject: Building H central section: Viewed from the north-west in Jones Street
Photographer: Robertson & Hindmarsh Pty Ltd, 2018
Copyright owner: No Credit
Date: No Date
Subject: Building H central section: Detail of the carved eaves of the west façade
Photographer: Robertson & Hindmarsh Pty Ltd, 2018
Copyright owner: No Credit
Date: No Date
Subject: Building H south section: Viewed from the south-west in Thomas Street with Building G behind
Photographer: Robertson & Hindmarsh Pty Ltd, 2018
Copyright owner: No Credit
Date: No Date
Subject: Building H south section: Looking north along the west facade in Jones Street
Photographer: Robertson & Hindmarsh Pty Ltd, 2018
Copyright owner: No Credit
Date: No Date
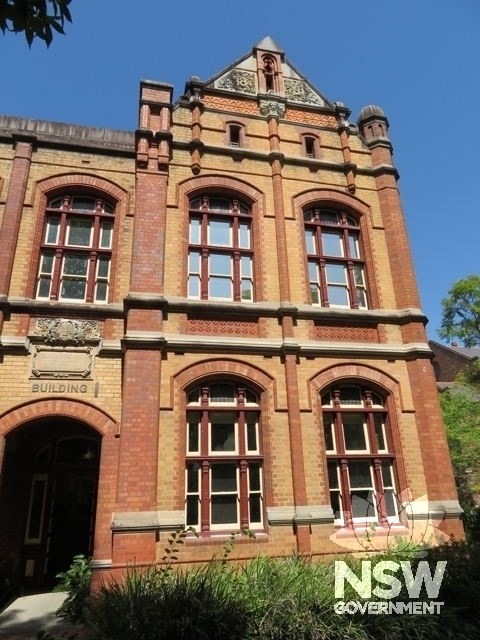
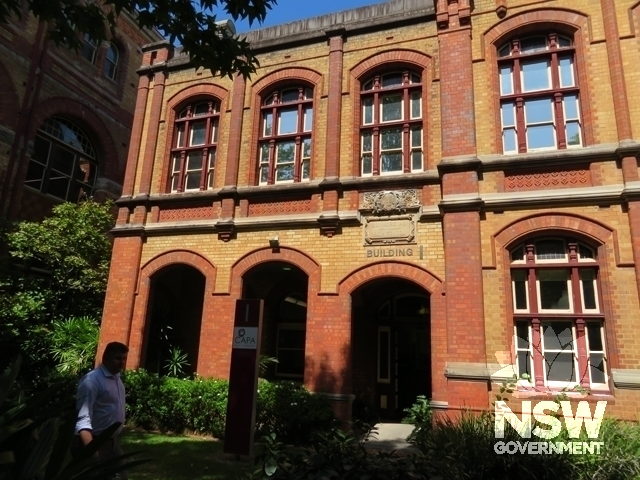
Subject: Building I: Viewed from the north
Photographer: Robertson & Hindmarsh Pty Ltd, 2018
Copyright owner: No Credit
Date: No Date
Subject: Building I: Viewed from the north
Photographer: Robertson & Hindmarsh Pty Ltd, 2018
Copyright owner: No Credit
Date: No Date
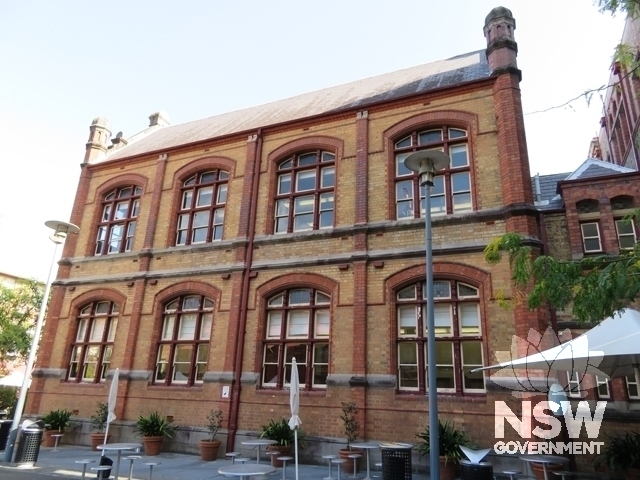
Subject: Building I: West façade
Photographer: Robertson & Hindmarsh Pty Ltd, 2018
Copyright owner: No Credit
Date: No Date
Subject: Building I: Looking north along the west façade
Photographer: Robertson & Hindmarsh Pty Ltd, 2018
Copyright owner: No Credit
Date: No Date
Subject: Building I: Part of the west façade
Photographer: Robertson & Hindmarsh Pty Ltd, 2018
Copyright owner: No Credit
Date: No Date
Subject: Building I: Front door in the north façade
Photographer: Robertson & Hindmarsh Pty Ltd, 2018
Copyright owner: No Credit
Date: No Date
Subject: Building I: Ground Floor level of main staircase
Photographer: Robertson & Hindmarsh Pty Ltd, 2018
Copyright owner: No Credit
Date: No Date
Subject: Building I: Ground Floor newel post of main staircase
Photographer: Robertson & Hindmarsh Pty Ltd, 2018
Copyright owner: No Credit
Date: No Date
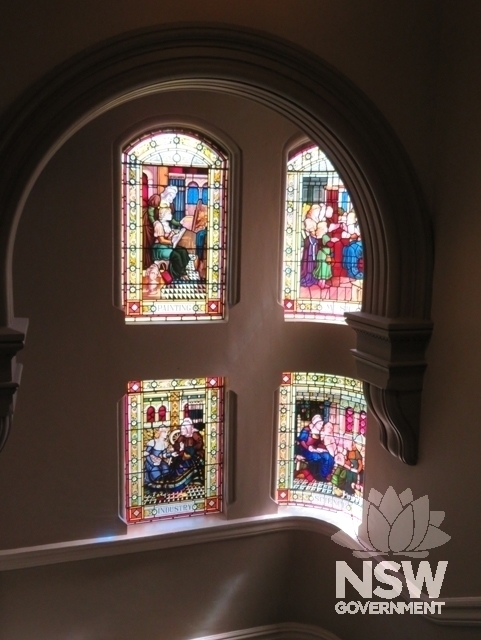
Subject: Building I: Stained glass windows on main staircase
Photographer: Robertson & Hindmarsh Pty Ltd, 2018
Copyright owner: No Credit
Date: No Date
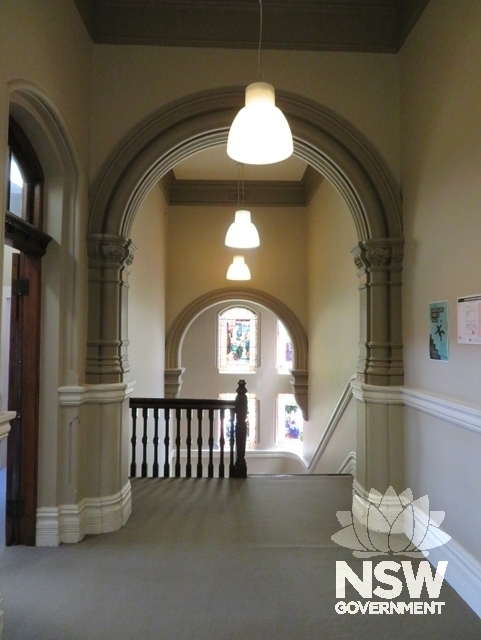
Subject: Building I: First Floor level of main staircase and corridor
Photographer: Robertson & Hindmarsh Pty Ltd, 2018
Copyright owner: No Credit
Date: No Date
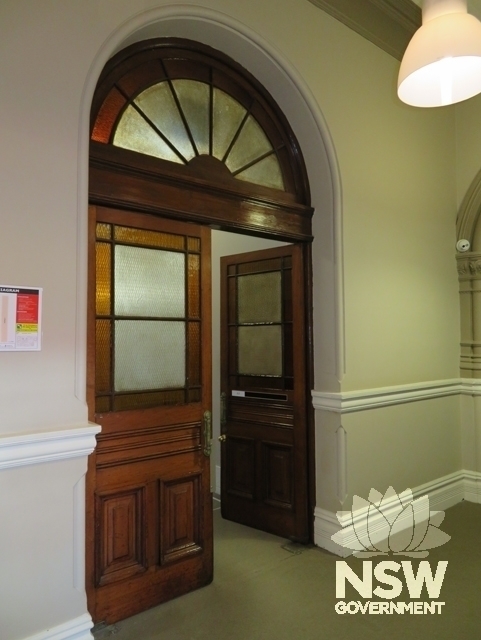
Subject: Building I: Doors to First Floor main room
Photographer: Robertson & Hindmarsh Pty Ltd, 2018
Copyright owner: No Credit
Date: No Date
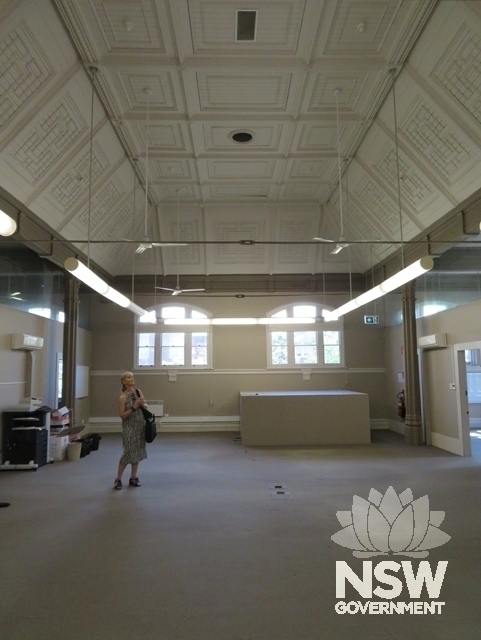
Subject: Building I: First Floor main room looking north
Photographer: Robertson & Hindmarsh Pty Ltd, 2018
Copyright owner: No Credit
Date: No Date
Subject: Building Z: North façade
Photographer: Robertson & Hindmarsh Pty Ltd, 2018
Copyright owner: No Credit
Date: No Date
Subject: Building Z: Looking east along the south façade
Photographer: Robertson & Hindmarsh Pty Ltd, 2018
Copyright owner: No Credit
Date: No Date
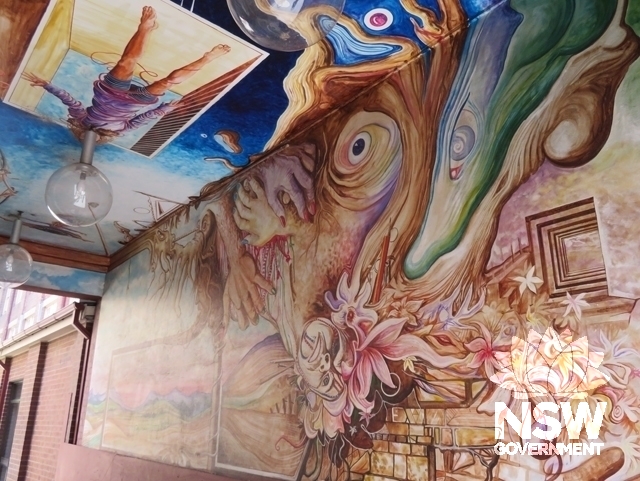
Subject: Building Z: Street art on the walls & ceiling of the passage under the west end of the building
Photographer: Robertson & Hindmarsh Pty Ltd, 2018
Copyright owner: No Credit
Date: No Date
![[Site Plan of] Technical College Ultimo Sydney by W.E. Kemp, 1891](https://previews.me.com.au/ingestion/917/image/large/000/000/000/000/000000000000081/239751xl.jpg)
![[Site Plan of] Technical College Ultimo Sydney by W.E. Kemp, 1899](https://previews.me.com.au/ingestion/917/image/large/000/000/000/000/000000000000083/254114xl.jpg)
![[Perspective of] New Technical College, Pyrmont, 1891](https://previews.me.com.au/ingestion/917/image/large/000/000/000/000/000000000000081/244880xl.jpg)
![[Perspective by Fulwood of] Sydney Technical College, 1891](https://previews.me.com.au/ingestion/917/image/large/000/000/000/000/000000000000081/241767xl.jpg)
![[Perspective of] Technological Museum, nd](https://previews.me.com.au/ingestion/917/image/large/000/000/000/000/000000000000083/245822xl.jpg)
![Sydney Technical College [Buildings C, B & A], nd](https://previews.me.com.au/ingestion/917/image/large/000/000/000/000/000000000000083/247432xl.jpg)
![Sydney Technical College [Buildings C, B & A], 1904](https://previews.me.com.au/ingestion/917/image/large/000/000/000/000/000000000000083/245532xl.jpg)
![Sydney Technical College [Building A], nd](https://previews.me.com.au/ingestion/917/image/large/000/000/000/000/000000000000083/254184xl.jpg)
![Sydney Technical College [Building A entry stonework], c.1915](https://previews.me.com.au/ingestion/917/image/large/000/000/000/000/000000000000083/249830xl.jpg)
![Sydney Technical College [Building A entry Lyon & Cottier stained glass], c.1876-1915](https://previews.me.com.au/ingestion/917/image/large/000/000/000/000/000000000000083/250033xl.jpg)
![Sydney Technical College [Buildings to the rear of Building A]](https://previews.me.com.au/ingestion/917/image/large/000/000/000/000/000000000000081/240167xl.jpg)